资源与内存
更新记录
2024/1/2 增加该文档
2024/5/11 更新该文档
2024/5/13 更新该文档
2024/5/13 增加
获取支持的设备内存章节。2024/5/13 增加
vkGetBufferMemoryRequirements章节。2024/5/13 增加
vkGetImageMemoryRequirements章节。2024/5/13 增加
VkMemoryRequirements章节。2024/5/17 更新
VkMemoryRequirements章节。2024/5/18 更新
VkMemoryRequirements章节。2024/5/21 更新
VkMemoryRequirements章节。2024/5/21 增加
资源与设备内存绑定章节。2024/9/6 更新
对应关系章节。2024/10/29 更新
资源与设备内存绑定章节。2024/11/5 更新
资源与设备内存绑定章节。
在 资源 章节中我们知道一个资源仅仅是一个 虚拟资源句柄 ,其本质上并没有相应的内存实体用于存储数据。所以在创建完资源后,需要分配内存并与资源进行绑定,用于之后的数据读写。
根据不同资源的不同配置,相应支持资源的内存策略不尽相同,比如:
当创建图片指定
VkImageCreateInfo::tiling为VkImageTiling::VK_IMAGE_TILING_OPTIMAL的话,一般期望是在Device端的本地内存 (VkMemoryPropertyFlagBits::VK_MEMORY_PROPERTY_DEVICE_LOCAL_BIT) 上进行内存分配并绑定。当创建图片指定
VkImageCreateInfo::tiling为VkImageTiling::VK_IMAGE_TILING_LINEAR的话,一般期望是在Host端的内存 (VkMemoryPropertyFlagBits::VK_MEMORY_PROPERTY_HOST_VISIBLE_BIT) 上进行内存分配并绑定。
为了能够获取支持资源的内存信息, Vulkan 为我们提供了如下查询接口:
vkGetBufferMemoryRequirements(...) 获取支持该缓存资源的内存信息。
vkGetImageMemoryRequirements(...) 获取支持该图片资源的内存信息。
获取支持的设备内存
其中 vkGetBufferMemoryRequirements(...) 和 vkGetImageMemoryRequirements(...) 定义如下:
vkGetBufferMemoryRequirements
// 由 VK_VERSION_1_0 提供
void vkGetBufferMemoryRequirements(
    VkDevice                                    device,
    VkBuffer                                    buffer,
    VkMemoryRequirements*                       pMemoryRequirements);
device 对应的逻辑设备。
buffer 目标缓存。
pMemoryRequirements 支持该缓存资源的内存信息。
vkGetImageMemoryRequirements
// 由 VK_VERSION_1_0 提供
void vkGetImageMemoryRequirements(
    VkDevice                                    device,
    VkImage                                     image,
    VkMemoryRequirements*                       pMemoryRequirements);
device 对应的逻辑设备。
image 目标图片。
pMemoryRequirements 支持该图片资源的内存信息。
无论是获取缓存支持的内存信息,还是图片的,其都会将资源支持的设备内存信息写入类型为 pMemoryRequirements 成员中,其类型为 VkMemoryRequirements ,定义如下:
VkMemoryRequirements
// 由 VK_VERSION_1_0 提供
typedef struct VkMemoryRequirements {
    VkDeviceSize    size;
    VkDeviceSize    alignment;
    uint32_t        memoryTypeBits;
} VkMemoryRequirements;
size 资源需要分配的设备内存大小。单位为
字节。alignment 为该资源绑定的设备内存起始地址 必须 进行内存对齐位数。单位为
字节。memoryTypeBits 支持的设备内存索引位域。
其中 memoryTypeBits 成员变量是最重要的设备内存信息。该参数为一个 uint32_t 类型变量,也就是一个 32 位的整形。
在 设备内存 章节的 VkPhysicalDeviceMemoryProperties 中给出了其定义,如下:
// 由 VK_VERSION_1_0 提供
typedef struct VkPhysicalDeviceMemoryProperties {
    uint32_t        memoryTypeCount;
    VkMemoryType    memoryTypes[VK_MAX_MEMORY_TYPES];
    uint32_t        memoryHeapCount;
    VkMemoryHeap    memoryHeaps[VK_MAX_MEMORY_HEAPS];
} VkPhysicalDeviceMemoryProperties;
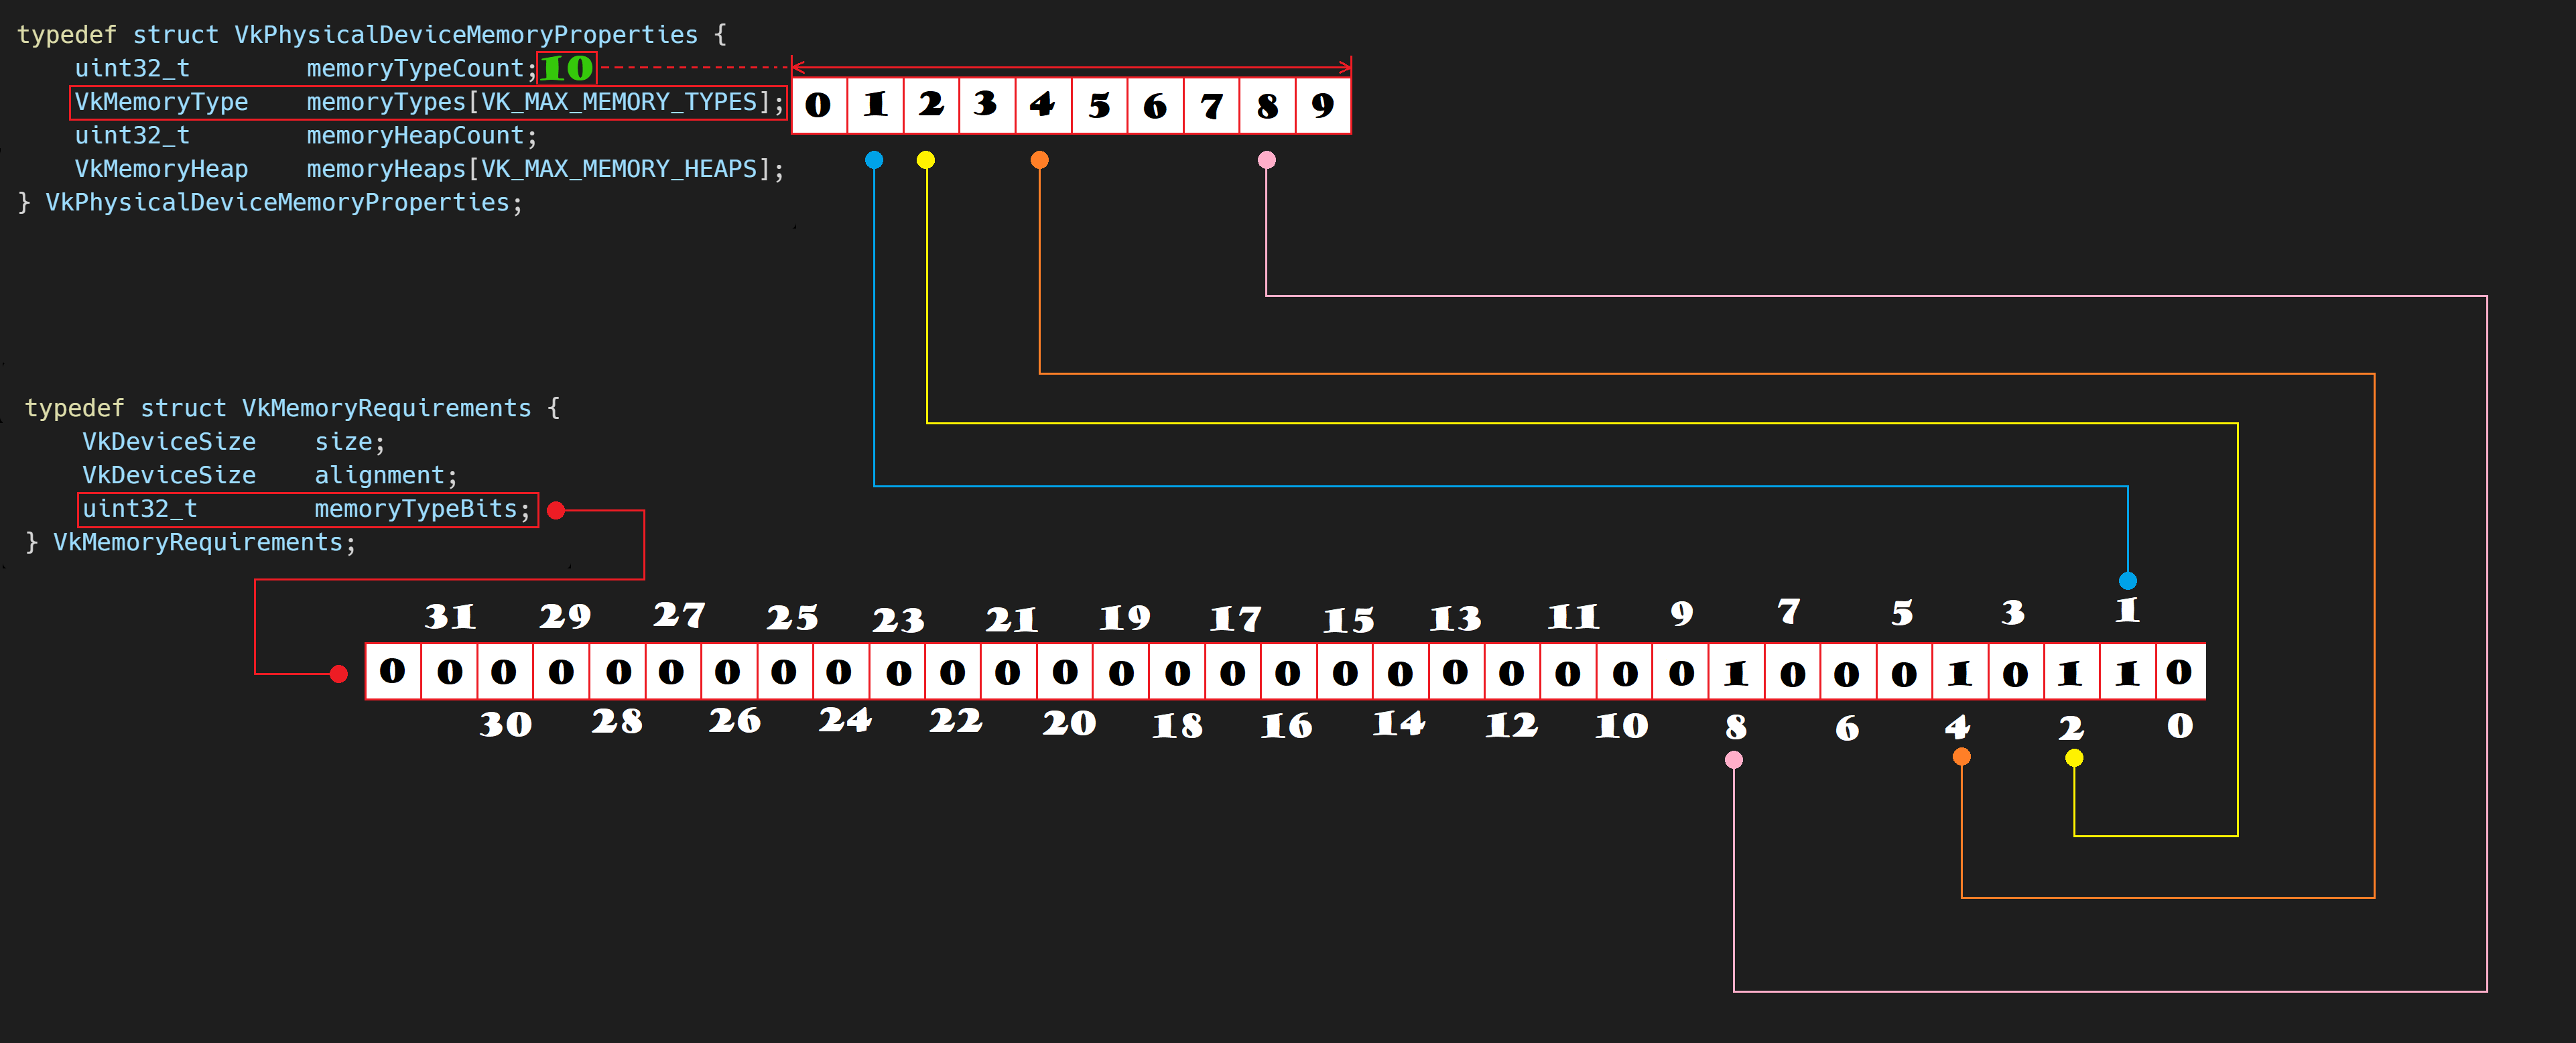
再此之前反复强调过 VkPhysicalDeviceMemoryProperties::memoryTypes 数组索引值非常重要,是因为 VkMemoryRequirements::memoryTypeBits 与 VkPhysicalDeviceMemoryProperties::memoryTypes 有对应关系。其对应关系如下:
对应关系
VkMemoryRequirements::memoryTypeBits 中的 32 个位,如果对应第 i 位为 1 说明 VkPhysicalDeviceMemoryProperties::memoryTypes[i] 对应的设备内存支持用于相应的资源。
VK_MAX_MEMORY_TYPES
由于 VK_MAX_MEMORY_TYPES 为 32 ,其定义如下:
#define VK_MAX_MEMORY_TYPES 32U
所以一个 32 位的 VkMemoryRequirements::memoryTypeBits 完全可以覆盖到所有的 VkPhysicalDeviceMemoryProperties::memoryTypes 对应索引。
示意图如下:

memoryTypeBits 与 memoryTypes
假如, VkPhysicalDeviceMemoryProperties::memoryTypes 有 10 个内存类型,其中 VkMemoryRequirements::memoryTypeBits 比特位为 1 所对应的内存索引的那个 设备内存 支持该为资源分配内存。
由于 VkMemoryRequirements::memoryTypeBits 中是按比特位存储的索引,所以我们需要遍历 32 位的每一位,来确定对应位是否为 1 。示例代码如下:
VkMemoryRequirements memory_requirements = 之前通过 vkGetBufferMemoryRequirements(...) 或 vkGetImageMemoryRequirements(...) 获得的 VkMemoryRequirements 信息;

uint32_t memory_type_bits = memory_requirements.memoryTypeBits;

std::vector<uint32_t> support_memory_type_indices; // 存储所有支持的设备内存类型索引

for(uint32_t index = 0; index < VK_MAX_MEMORY_TYPES; index++)
{
   if((memory_type_bits & 1) == 1)
   {
      support_memory_type_indices.push_back(index);
   }

   memory_type_bits >>= 1; // 向右移1位,依次遍历所有比特位
}
如上,便得到了所有支持对应资源的设备内存类型索引。之后就可以根据这些索引来筛选出满足需求的设备内存。比如筛选出带有 VkMemoryPropertyFlagBits::VK_MEMORY_PROPERTY_DEVICE_LOCAL_BIT 的设备本地内存:
VkPhysicalDeviceMemoryProperties physical_device_memory_properties = 之前通过 vkGetPhysicalDeviceMemoryProperties(...) 获取到的设备内存信息;

std::vector<uint32_t> support_memory_type_indices = 之前筛选出的所有支持对应资源的设备内存索引;

std::vector<uint32_t> available_device_local_memory_type_indices; // 存储支持 VkMemoryPropertyFlagBits::VK_MEMORY_PROPERTY_DEVICE_LOCAL_BIT 的设备内存类型索引

for(uint32_t index = 0; index < support_memory_type_indices.size(); index++)
{
   uint32_t memory_type_index = support_memory_type_indices[index];
   VkMemoryType memory_type = physical_device_memory_properties.memoryTypes[memory_type_index];

   // 如果对应的设备内存支持 VkMemoryPropertyFlagBits::VK_MEMORY_PROPERTY_DEVICE_LOCAL_BIT,则为我们期望的设备内存,存储其索引
   if((memory_type.propertyFlags & VkMemoryPropertyFlagBits::VK_MEMORY_PROPERTY_DEVICE_LOCAL_BIT) == VkMemoryPropertyFlagBits::VK_MEMORY_PROPERTY_DEVICE_LOCAL_BIT)
   {
      available_device_local_memory_type_indices.push_back(memory_type_index);
   }
}

if(!available_device_local_memory_type_indices.empty())
{
   // 找到了既支持资源也支持 VkMemoryPropertyFlagBits::VK_MEMORY_PROPERTY_DEVICE_LOCAL_BIT 的设备内存类型索引
   for(uint32_t index = 0; index < available_device_local_memory_type_indices.size(); index++)
   {
      uint32_t memory_type_index = available_device_local_memory_type_indices[index];
      ... // 使用 memory_type_index 分配内存
   }
}
else
{
   throw std::runtime_error("没找到支持的内存类型");
}
以此类推,我们就可以根据不同的需求,筛选出不同情况下最理想的设备内存索引,并在之后用于 内存分配 。
资源与设备内存绑定
通过之前的介绍,我们已经知道两件事:
如何在我们需要的设备内存上申请内存
如何创建我们需要的资源
现在 资源 和 设备内存 都有了,接下来就可以将两者进行关联,即 绑定 。
绑定 主要有两种:
缓存与设备内存进行绑定。对应的接口为vkBindBufferMemory(...)。图片与设备内存进行绑定。对应的接口为vkBindImageMemory(...)。
接口定义如下:
// 由 VK_VERSION_1_0 提供
VkResult vkBindBufferMemory(
    VkDevice                                    device,
    VkBuffer                                    buffer,
    VkDeviceMemory                              memory,
    VkDeviceSize                                memoryOffset);
device 对应的逻辑设备。
buffer 对应绑定的缓存。
memory 对应绑定的设备内存。
memoryOffset 对应绑定的设备内存的相对偏移。
// 由 VK_VERSION_1_0 提供
VkResult vkBindImageMemory(
    VkDevice                                    device,
    VkImage                                     image,
    VkDeviceMemory                              memory,
    VkDeviceSize                                memoryOffset);
device 对应的逻辑设备。
image 对应绑定的图片。
memory 对应绑定的设备内存。
memoryOffset 对应绑定的设备内存的相对偏移。
其中 buffer 、 memory 和 image 都需要从 device 中创建出来,这个不需要再赘述。这里主要需要说明一下 memoryOffset 参数的作用。
在 Vulkan 中其鼓励用户创建分配一块大的设备内存,不同的资源占用该设备内存不同的部分。这不仅能够最大化重复利用一块内存,优化内存使用率,也为用户制定自定义内存管理机制提供途径。这样设计的根本原因是: Vulkan 对于 VkDeviceMemory 创建的数量有 上限 。
在 获取物理设备信息 章节中我们知道其内部有 VkPhysicalDeviceLimits 限制信息。其中有 maxMemoryAllocationCount 成员:
// 由 VK_VERSION_1_0 提供s
typedef struct VkPhysicalDeviceLimits {
    ...
    uint32_t maxMemoryAllocationCount;
    ...
} VkPhysicalDeviceLimits;
maxMemoryAllocationCount 可通过 vkAllocateMemory 创建的最大同时存在的设备内存数量。且
Vulkan要求该限制数量不能小于4096

设备内存与资源绑定示意图
当 vkBind[Buffer/Image]Memory(...) 函数返回 VkResult::VK_SUCCESS 说明只有躯壳的资源终于拥有了灵魂,它的一生完整了!
Vulkan 设备内存管理
Vulkan 为用户自定义内存管理提供了可能,但实现一个高效稳健的内存管理系统并不是一件容易事。用户可以使用 AMD 在 GPU Open 计划中推出的 Vulkan® Memory Allocator (VMA) 进行设备内存管理。有关如何使用 VMA 将会在专门的章节中进行讲解。